ArgoCD - Declarative Cluster Onboarding
This guide describes the end-to-end integration for a declarative AKS cluster onboarding process with ArgoCD, Azure Key Vault and Workload Identity, enabling seamless integration of new clusters into the ArgoCD control plane. This architecture leverages Terraform, Azure Key Vault & External Secrets Operator to manage authentication, streamline cluster onboarding, and ensure secure, automated configuration.
Architecture
This declarative cluster onboarding integration consists of 4 main phases that work together to seamlessly add new AKS clusters to ArgoCD:
1. AKS Cluster Creation & Secret Storage
To enable centralized secret management, the AKS module is configured to output essential cluster values during creation:
- Terraform AKS module outputs cluster CA certificate and API server URL
- These values get automatically stored as secrets in Azure Key Vault with naming convention
${cluster_name}-ca-certand${cluster_name}-server-url
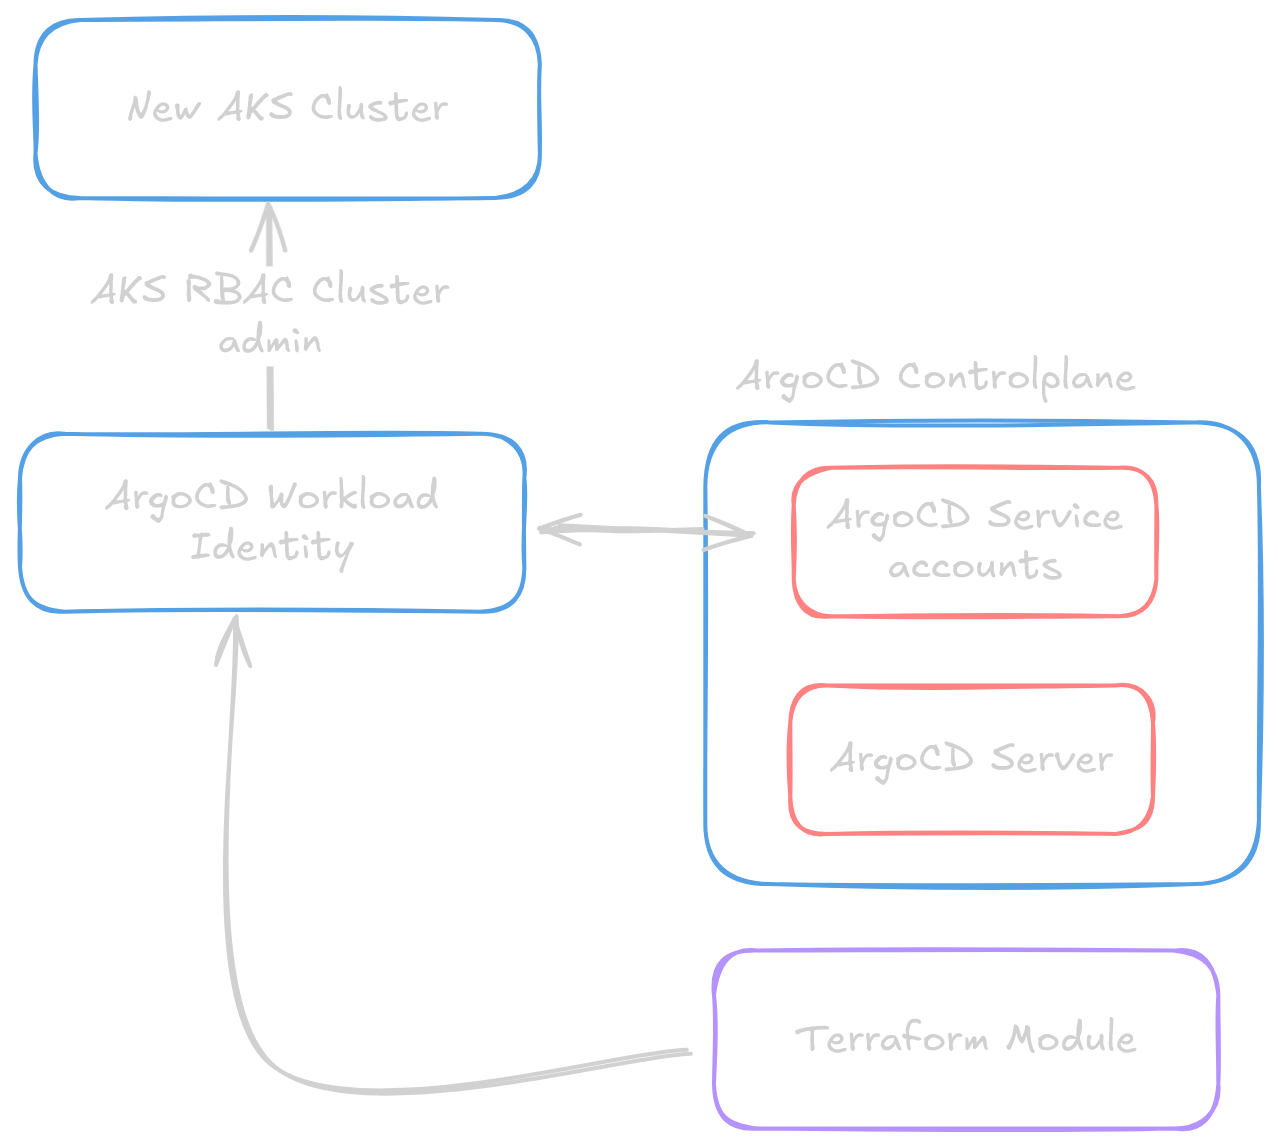
2. ArgoCD Setup with Workload Identity Federation
ArgoCD has to be configured to automatically discover and manage new clusters using the secrets stored in Azure Key Vault. This is achieved through:
- ArgoCD operates as a self-managing application using GitOps on its own configuration
- Federated credentials are created linking service accounts to User Managed Identities (UMIs)
- ArgoCD service accounts get Azure workload identity annotations
- Role assignments grant ArgoCD
Azure Kubernetes Service RBAC Cluster Adminpermissions on new clusters
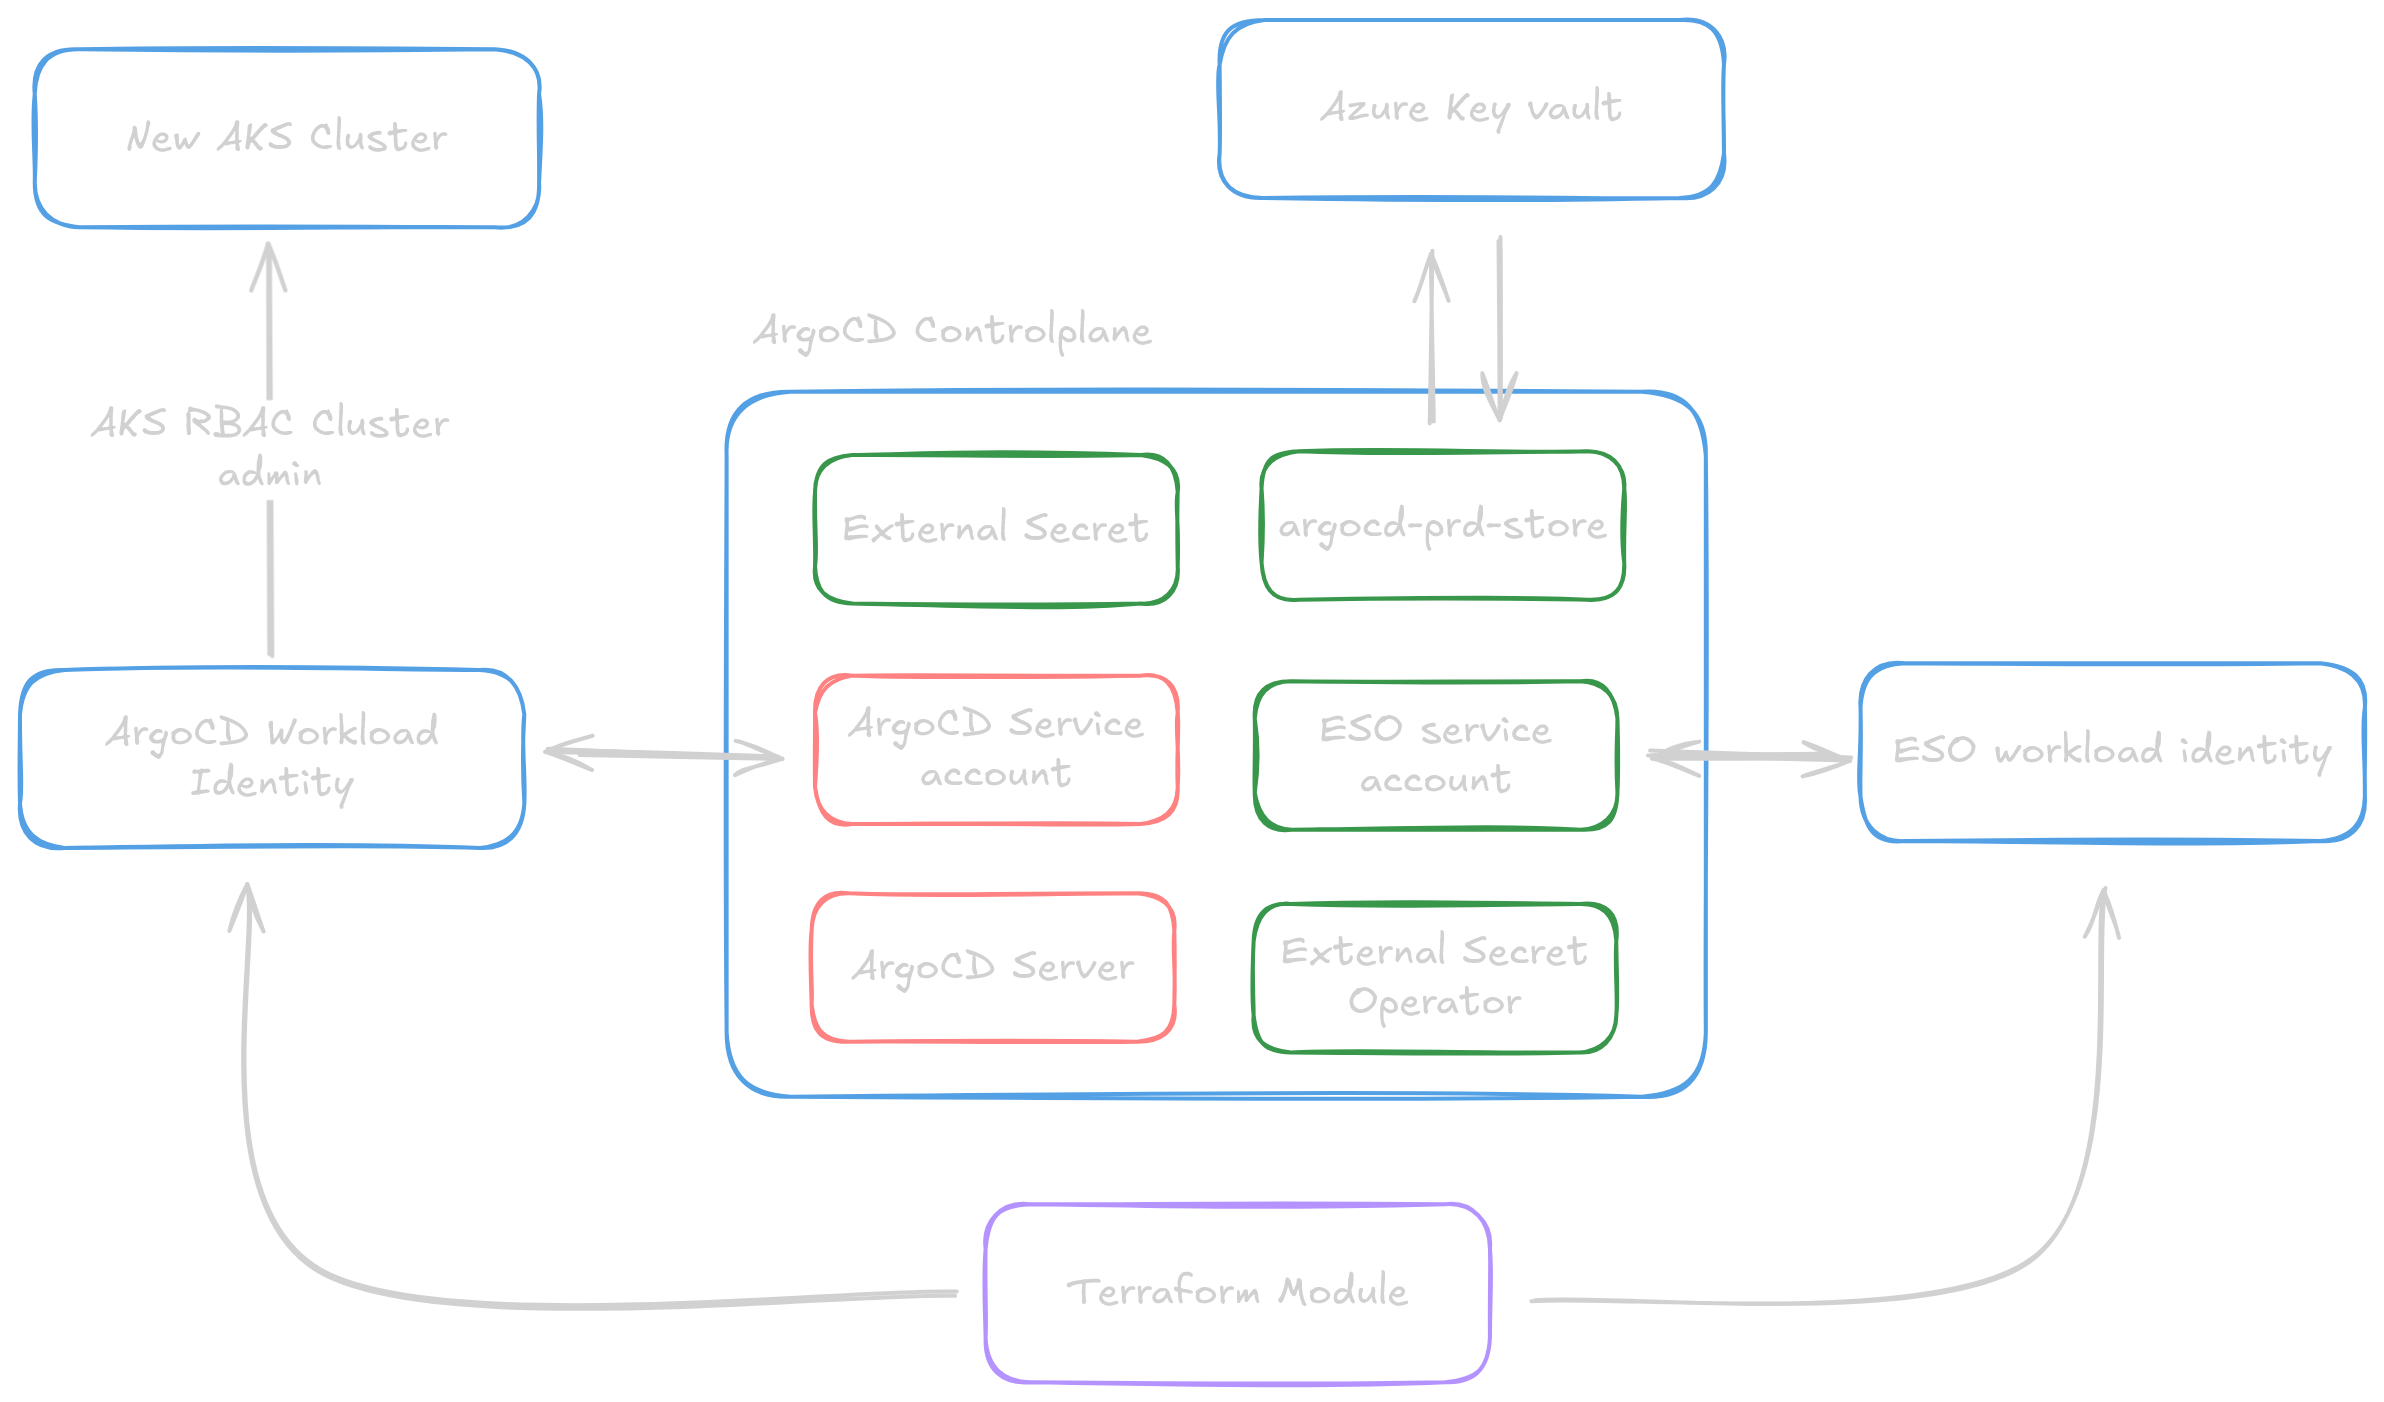
3. Cluster Bootstrap with External Secrets Operator
We need to be able to retrieve the values from phase 1 in a secure manner, this is where the External Secrets Operator (ESO) comes into play:
- External Secrets Operator (ESO) gets deployed with its own workload identity federation
SecretStoreobjects connect ESO to Azure Key Vault for secure secret retrieval- ESO service account gets "Key Vault Secrets User" role for accessing stored cluster credentials
- Provides the bridge between Azure Key Vault and Kubernetes secrets
4. Declarative Cluster Addition via Kustomize
Once the previous steps have been implemented, we can start defining clusters in ArgoCD declaratively:
- Kustomize overlays create
ExternalSecretresources that fetch cluster credentials from Key Vault - Generated secrets with label
argocd.argoproj.io/secret-type: clustertrigger automatic cluster discovery - Enables fully code-driven cluster onboarding with minor manual intervention.
This architecture ensures zero-credential management, automated onboarding, and secure authentication through Azure's native identity systems.
1. Configure AKS module to output values & store them in Azure Key Vault
.B9X1Kr7Y.png)
This section explains how to dynamically store specific values, required by ArgoCD for cluster onboarding, during the creation of an AKS cluster. To achieve this, the Terraform module will output two essential values generated during the creation, which are then stored securely in Azure Key Vault.
INFO
- The Terraform identity handles the creation of secrets in the Key Vault, it is assumed this identity has the rights to perform actions on the keyvault.
- We will be assuming the usage of This AKS module for cluster creation. Feel free to fork the code to suit your own environment. You are not required to use this module, it is maintained purely for illustration purposes and as a solid foundational template.
1.1 Configure module to output values
The code below generates outputs for:
cluster_ca_certificate: The certificate authority (CA) certificate for the AKS cluster.aks_cluster_api_server_url: The API server URL for accessing the AKS cluster.
Output values
output "cluster_ca_certificate" {
  value = azurerm_kubernetes_cluster.cluster.kube_config.0.cluster_ca_certificate
}

output "aks_cluster_api_server_url" {
  value = azurerm_kubernetes_cluster.cluster.kube_config.0.host
}
1.2 Saving Outputs as Key Vault Secrets
When creating an AKS cluster, we must create 2 azurerm_key_vault_secret resources to store these two values outputted by the module in a Key Vault instance. These will later be used in creating a secret that is recognised by ArgoCD to facilitate secure auto-joining.
Create terraform resources
The secrets stored are:
- CA Certificate: A unique certificate for validating cluster identity. using naming convention
${module.aks.cluster_name}-ca-cert - API Server URL: The URL for accessing the AKS API. Using naming convention
${module.aks.cluster_name}-server-url
resource "azurerm_key_vault_secret" "cluster_ca_cert" {
  name         = "${module.aks.cluster_name}-ca-cert"
  value        = module.aks.cluster_ca_certificate
  key_vault_id = data.azurerm_key_vault.argocd_prd_akv.id
}

resource "azurerm_key_vault_secret" "cluster_api_server_url" {
  name         = "${module.aks.cluster_name}-server-url"
  value        = module.aks.aks_cluster_api_server_url
  key_vault_id = data.azurerm_key_vault.argocd_prd_akv.id
}
In this example, both secrets are stored in the argocd-prd-akv Key Vault. This Key Vault should already exist in your environment or be created as part of the setup. Update the name and resource group to match your specific environment.
data "azurerm_key_vault" "argocd_prd_akv" {
  name                = "argocd-prd-akv"
  resource_group_name = "argocd-prd-rg"
}
I've omitted this part from the AKS module as to not create a direct dependency between cluster creation and an Azure Key Vault. But if you feel like it, you could tightly couple this functionality to the module.
2. Install ArgoCD & Configure workload identity federation
In this section, we outline the configurations that enable ArgoCD to automatically, securely, and seamlessly add new clusters to its management system. By leveraging workload identity federation, role assignments, and federated credentials via Terraform, this setup ensures that ArgoCD can connect to newly created clusters with minimal manual intervention.
2.1 Configuring Workload Identity Federation with Terraform
Below, we outline the Terraform configurations in the terraform-azurerm-aks module used to automate this process.
iam.tf - Federated Credentials
The following module gets called in AKS module to set up federated credentials. Each federated credential is mapped based on its defined purpose.
module "federated_credentials" {
  for_each = { for index, federated_credential in local.federated_credentials : federated_credential.purpose => federated_credential }
  source   = "github.com/michielvha/federatedcredentials/azurerm"
  version  = ">=0.0.1,<1.0.0"

  base_resource_name = module.aks.cluster_name
  oidc_issuer_url    = module.aks.oidc_issuer_url
  purpose            = each.value.purpose
  resource_group     = module.resource_group.resource_group
  service_accounts   = each.value.service_accounts
}
locals.tf - Federated Credentials
This configuration ensures that both the ArgoCD server and the application controller service accounts can access the required clusters. multiple service accounts can be linked to the same UMI.
WARNING
if you are using applicationSets the applicationSetsController service account should also be added here.
    federated_credentials = [
      {
        purpose = "argocd-prd"
        service_accounts = [
          {
            service_account_name = "argocd-server"
            namespace            = "argocd"
          },
          {
            service_account_name = "argocd-application-controller"
            namespace            = "argocd"
          }
        ]
      }
    ]
TIP
the argocd server and application controller service accounts both need access to be able to add the clusters. This is not clearly documented in the official documentation.
main.tf - Role Assignments
The following resource assignment ensures that the ArgoCD service accounts have the required permissions to manage newly created clusters as cluster administrators. Azure Kubernetes Service RBAC Cluster Admin is required.
resource "azurerm_role_assignment" "argocd_server_role_assignment" {
  principal_id         = coalesce(var.argocd_server_wi.principal_id, local.default_argocd_wi)
  scope                = azurerm_kubernetes_cluster.cluster.id
  role_definition_name = "Azure Kubernetes Service RBAC Cluster Admin"
}
locals.tf - Role Assignments
The client_id of the User-Managed Identity (UMI) associated with the ArgoCD server and application controller, is defined in locals.tf.
To avoid potential disruptions, such as when the Service Principal (SPN) changes due to ArgoCD being moved to a different cluster, you must ensure the default_argocd_wi value is updated accordingly. This ensures continuity in permissions and functionality.
default_argocd_wi = "<ARGOCD_UMI_CLIENT_ID>"2.2 Set annotations on argocd deployment and service accounts
Annotate ArgoCD Service Accounts:
Modify the argocd-server and argocd-application-controller service accounts with the required annotations. These annotations should include the client-id generated by Terraform.
apiVersion: v1
kind: ServiceAccount
metadata:
  name: argocd-server
  annotations:
    azure.workload.identity/client-id: <ARGOCD_UMI_CLIENT_ID>
    azure.workload.identity/tenant-id: <YOUR_TENANT_ID>
---
apiVersion: v1
kind: ServiceAccount
metadata:
  name: argocd-application-controller
  annotations:
    azure.workload.identity/client-id: <ARGOCD_UMI_CLIENT_ID>
    azure.workload.identity/tenant-id: <YOUR_TENANT_ID>
Update ArgoCD Deployments with Azure Identity Annotation:
Ensure the azure.workload.identity/use annotation is set to "true" on both the argocd-server deployment and the argocd-application-controller. This is a crucial step for enabling Azure Workload Identity on these components. We also configure reloader.
apiVersion: apps/v1
kind: Deployment
metadata:
  name: argocd-server
spec:
  template:
    metadata:
      annotations:
        reloader.stakater.com/auto: "true"
      labels:
        azure.workload.identity/use: "true"
---
apiVersion:  apps/v1
kind: StatefulSet
metadata:
  name: argocd-application-controller
spec:
  template:
    metadata:
      annotations:
        reloader.stakater.com/auto: "true"
      labels:
        azure.workload.identity/use: "true"
Later on (step 4) we'll detail how to declaratively add clusters to ArgoCD, which will utilize this plumbing for secure access.
3. Configure cluster-bootstrap application
TODO: Review charter order / headings

After deploying a new cluster we'll have to boostrap some foundational apps and their integrations that are core to the system. For this purpose it's a great idea to configure a cluster-bootstrap application that will handle the setup of these core services.
post deployment step, ensuring that the ESO is set up after the initial cluster deployment.
3.1 Overview of cluster-bootstrap application
- External Secrets Operator (ESO) with workload identity federation ESO allows for the creation of Kubernetes Secret objects from azure keyvault secrets, making secrets readily accessible to applications without mounting them directly into containers. This approach enhances security and simplifies secret management.
3.2 Setup - Setting Up the External Secrets Operator (ESO)
This section outlines the configuration needed to enable the External Secrets Operator (ESO) to securely fetch secrets from Azure Key Vault. We will be including this configuration in a
The External Secrets Operator (ESO) is a key component of any cluster setup, we advise adding it to a postdeployment configuration. This ensures that the operator is installed after the cluster's initial setup, allowing it to fetch secrets from Azure Key Vault and create Kubernetes Secret` objects as needed.
You can find how we deploy the ESO in our Kubernetes resource repository.
3.3 Setting Up SecretStore with Workload Identity configured via terraform
Workload Identity is preferred due to its native integration with the platform, eliminating the need for secret rotation while enhancing security.
When bootstrapping a cluster, the Terraform module includes a configuration to set up Workload Identity. This process involves defining User Managed Identities (UMIs) and establishing federated credentials, enabling Workload Identity Federation for secure access to Azure Key Vault secrets.
Example Configuration: iam.tf - Federated Credentials
The following Terraform configuration loops through federated credentials defined in locals.tf and applies them to the cloud provider. The service_account specified in each federated credential will be authorized to retrieve secrets from Azure Key Vault.
module "federated_credentials" {
  for_each = { for index, federated_credential in local.federated_credentials : federated_credential.purpose => federated_credential }
  source   = "github.com/michielvha/federatedcredentials/azurerm"
  version  = ">=0.0.1,<1.0.0"

  base_resource_name = module.aks.cluster_name
  oidc_issuer_url    = module.aks.oidc_issuer_url
  purpose            = each.value.purpose
  resource_group     = module.resource_group.resource_group
  service_accounts = {
    name      = each.value.service_account_name
    namespace = each.value.namespace
  }
}
In this configuration, the loop iterates over all federated credentials specified in locals.tf, ensuring the appropriate service accounts have the correct federation set based on cluster_name & oidc_issuer_url.
Example Configuration: locals.tf - Federated Credentials
This configuration file lists the federated credentials used by specific service accounts to access Azure Key Vault secrets.
federated_credentials = [
  {
    service_account_name   = "eso-sa"
    namespace              = "external-secrets"
    purpose                = "argocd-prd-akv-access"
  }
]
After creating the UMIs, we must assign the appropriate roles to allow access to Key Vault.
Example Configuration: iam.tf - Role Assignments
In this example, role assignments are created to grant the necessary permissions to access specific Key Vaults.
The purpose parameter is used to specify which federated credential is being assigned a role. The principal_id is derived from the federated credential module, which provides the object ID of the User Managed Identity (UMI) created for the service account.
resource "azurerm_role_assignment" "federated_credentials_role_assignment_localfoundation" {
  provider             = azurerm.mgmt
  scope                = data.azurerm_key_vault.argocd_prd_akv.id
  role_definition_name = "Key Vault Secrets User"
  principal_id         = module.federated_credentials["argocd-prd-akv-access"].object_id
}
Example Configuration: data.tf - Role Assignments
The data.tf configuration is required to import the Key Vaults that the system will interact with.
data "azurerm_key_vault" "argocd_prd_akv" {
  name                = "argocd-prd-akv"
  resource_group_name = "argocd-prd-rg"
}
This setup ensures that the Key Vaults can be referenced correctly, and the User managed identities have the correct federated credentials with the necessary access configured to retrieve the required secrets.
3.4 Creating Kubernetes Objects for Secret Access
Service Account Configuration
After setting up the User Managed Identities (UMIs) with federated credentials, the next step is to create a Kubernetes ServiceAccount for each identity. This ServiceAccount must have the same name and namespace as the UMI configuration to ensure proper linking. Additionally, it should include annotations specifying the client-id and tenant-id associated with each UMI, as shown in the examples below:
apiVersion: v1
kind: ServiceAccount
metadata:
  name: eso-sa
  namespace: external-secrets
  annotations:
    azure.workload.identity/client-id: <UMI_CLIENT_ID>
    azure.workload.identity/tenant-id: <YOUR_TENANT_ID>
Configuring the SecretStore
To link Azure Key Vaults to our Kubernetes cluster, we need to create SecretStore objects. These objects define how secrets are fetched from Key Vault and which ServiceAccount will be used for authentication. In our setup, we configure two ClusterSecretStore objects, each with a unique vault URL and associated ServiceAccount:
apiVersion: external-secrets.io/v1
kind: SecretStore
metadata:
  name: argocd-prd-store
  namespace: external-secrets
spec:
  provider:
    azurekv:
      authType: WorkloadIdentity
      vaultUrl: "https://argocd-prd-akv.vault.azure.net"
      serviceAccountRef:
        name: eso-sa
In this configuration:
- The
SecretStoreobject points to a specific Azure Key Vault instance (e.g.,argocd-prd-akv). - The
authTypeis set toWorkloadIdentityto leverage Azure’s workload identity for authentication. - The
serviceAccountRefspecifies theServiceAccountused to access the Key Vault.
Using the configuration above, the argocd-prd-store is linked to the keyvault that holds the terraform outputs.
This allows our ArgoCD cluster to fetch the secrets previously stored in Azure Key Vault, such as the CA certificate and API server URL, which are essential for securely connecting to the AKS cluster.
4. Declaratively Add Clusters to ArgoCD
By now we have reached a configuration as shown below, where we have a fully functional ArgoCD** instance that can automatically onboard new clusters.
All we have to do is create ExternalSecret resources that will bootstrap a Secret that ArgoCD can use to discover the new clusters.
This section explains the Kustomize setup implemented to streamline the injection of new cluster secrets into ArgoCD.
4.1 ArgoCD Self-Managing Application
When deploying ArgoCD, we also create an ArgoCD Application resource specifically for managing ArgoCD itself. This setup enables ArgoCD to operate as a self-managing application, meaning it continuously monitors and maintains its own configuration. Any updates to the configuration are automatically detected and applied, ensuring consistency and reducing the need for manual intervention.
This self-management approach uses ArgoCD’s own continuous deployment capabilities to achieve automation for updates, patching, and scaling.
Example Configuration
The following YAML configuration defines ArgoCD as an Application resource. Let’s break down each component of this configuration:
apiVersion: argoproj.io/v1alpha1
kind: Application
metadata:
  name: argocd
  namespace: argocd
  labels:
    name: argocd
    squad: azure-aws
    env: hub
  finalizers:
  - resources-finalizer.argocd.argoproj.io
spec:
  destination:
    namespace: argocd
    name: in-cluster
  project: default
  source:
    path: manifests/argocd/overlays/prd
    repoURL: https://github.com/michielvha/template-argocd/manifests/argocd/overlays/prd
    targetRevision: main
  syncPolicy:
    automated:
      selfHeal: true
      prune: true
    syncOptions:
      - PruneLast=true
4.2 Kustomize Structure
Kustomize is used to manage repository configurations. This setup allows us to easily add new clusters by simply duplicating an existing environment, making minor modifications, and deploying the configuration. This approach ensures consistency and efficiency when scaling cluster management.
Base Clusters
We maintain a base configuration in the template-argocd repository, in our base/aks-clusters folder, an external secret manifest is defined, we need to overlay several values to kustomize it for each cluster which serves as a template for all clusters. This base configuration includes the necessary ExternalSecret manifest that defines how secrets are fetched from Azure Key Vault and injected into ArgoCD.
The base/aks-clusters folder contains the foundational ExternalSecret manifest, which serves as the template for configuring secrets for each new cluster. By using this base configuration, we can maintain a standardized setup across clusters, simplifying both the deployment and governance of the cluster secrets whenever a new cluster is bootstrapped.
Production Configuration
apiVersion: external-secrets.io/v1
kind: ExternalSecret
metadata:
  name: <TO_OVERLAY>
spec:
  refreshInterval: 1h
  secretStoreRef:
    name: argocd-prd-store
    kind: SecretStore
  target:
    name: <TO_OVERLAY>
    creationPolicy: Owner
    template:
      type: Opaque
      metadata:
        labels:
          argocd.argoproj.io/secret-type: cluster
      data:
        name: <TO_OVERLAY>
        server: "{{ .serverUrl }}"
        config: |
          {
            "execProviderConfig": {
              "command": "argocd-k8s-auth",
              "env": {
                "AZURE_CLIENT_ID": "<ARGOCD_SERVER/APP-CONTROLLER_SA_UMI>",
                "AZURE_TENANT_ID": "<YOUR_TENANT_ID>",
                "AZURE_FEDERATED_TOKEN_FILE": "/var/run/secrets/azure/tokens/azure-identity-token",
                "AZURE_AUTHORITY_HOST": "https://login.microsoftonline.com/",
                "AAD_ENVIRONMENT_NAME": "AzurePublicCloud",
                "AAD_LOGIN_METHOD": "workloadidentity"
              },
              "args": ["azure"],
              "apiVersion": "client.authentication.k8s.io/v1beta1"
            },
            "tlsClientConfig": {
              "insecure": false,
              "caData": "{{ .caCert }}"
            }
          }
  data:
  - secretKey: caCert
    remoteRef:
      key: <TO_OVERLAY>
  - secretKey: serverUrl
    remoteRef:
      key: <TO_OVERLAY>
4.3 Add new Cluster to ArgoCD
The template-argocd repository is structured to utilize Kustomize for easy management across different environments. Each environment is represented by its own folder within the Kustomize setup. To configure a new environment, follow these steps:
Create (or copy) new Environment Folder
Start by creating (or copying) a new folder specific to our environment in overlays/prd/clusters. This folder will contain custom configuration files for that particular environment.
TIP
Don't forget to include a new entry for your environment in the kustomization.yaml file in overlays/prd/clusters directory, or our config won't be included upon rendering.
Configure the kustomization.yaml File
in our newly created folder, add a kustomization.yaml file. This file will define how Kustomize should apply configurations specific to our new environment. Use the following template as a starting point, modifying values as necessary:
apiVersion: kustomize.config.k8s.io/v1beta1
kind: Kustomization

resources:
- ../../../../base/aks-clusters

patches:
- target:
    kind: ExternalSecret
  patch: |-
    - op: replace
      path: /metadata/name
      value: <aks_cluster_name>-cluster-external-secret
    - op: replace
      path: /spec/target/name
      value: <aks_cluster_name>-cluster-secret
    - op: replace
      path: /spec/target/template/data/name
      value: <aks_cluster_name>
    - op: replace
      path: /spec/data/0/remoteRef/key
      value: secret/<aks_cluster_name>-ca-cert
    - op: replace
      path: /spec/data/1/remoteRef/key
      value: secret/<aks_cluster_name>-server-url
When this new overlay folder is added to the kustomization.yaml file, ArgoCD will automatically apply it. This is possible because ArgoCD operates as a self-managing application, meaning it performs continuous deployment (CD) on its own configuration.
To enable ArgoCD to recognize and add new clusters, the secret is created with a specific label: argocd.argoproj.io/secret-type: cluster. The ArgoCD server watches for any secrets with this label and initiates the cluster addition process upon detection.
Customize for our Environment:
In the kustomization.yaml file, replace placeholder <aks_cluster_name> with the cluster name.
5. Declaratively Add Repo to ArgoCD
TODO: Add graphic to show the flow.
The Repositories referenced are added to ArgoCD declaratively by creating ArgoCD secrets with specific labels, enabling automated and consistent repository management across environments. This method, like the one above, leverages ExternalSecret resources, ensuring that project repository credentials remain secure and centralized.
5.1 Kustomize Workflow
To ensure consistent management, a Kustomize workflow was established for declaratively adding project repositories to ArgoCD.
Base
The base configuration for repository secrets resides in manifests/base/repos. This base file defines the structure of the secret, allowing overlays to be applied for specific environments or squads.
Example Base Configuration
Here is the example base Configuration for a repository secret:
apiVersion: external-secrets.io/v1beta1
kind: ExternalSecret
metadata:
  name: <TO_OVERLAY>
spec:
  refreshInterval: 1h
  secretStoreRef:
    name: argocd-prd-store
    kind: SecretStore
  target:
    name: <TO_OVERLAY>
    creationPolicy: Owner
    template:
      type: Opaque
      metadata:
        labels:
          argocd.argoproj.io/secret-type: repo-creds
      data:
        type: git
        url: <TO_OVERLAY>
        password: "{{ .password }}"
        username: "{{ .username }}"
  data:
  - secretKey: password
    remoteRef:
      key: <TO_OVERLAY>
  - secretKey: username
    remoteRef:
      key: <TO_OVERLAY>
Overlay
The repos directory within the overlay folder contains configuration folders per repository.
This Kustomize workflow should be followed when adding new repositories, ensuring standardized and secure repository management.
5.2 Add a New Project Repository via Kustomize Workflow
To add a new repository using the Kustomize workflow:
Create a New Secret for the Repository:
- Whenever a new repo needs to be added create a new folder with the repo name.
- Define a new
Kustomization.yamlfile in this folder based on an old one. - Overlay a new name for the external secret, the target secret and the repo URL.
Example overlay configruation
YAMLpatches: - target: kind: ExternalSecret patch: |- - op: replace path: /metadata/name value: team-repo-external-secret - op: replace path: /spec/target/name value: team-repo-secret - op: replace path: /spec/target/template/data/url value: https://github.com/michielvha/template-argocdApply Overlays:
- Don't forget to add this new folder in the root kustomization file of the
overlay/reposdirectory. Adding the folder will trigger ArgoCD to apply the configuration.
- Don't forget to add this new folder in the root kustomization file of the
INFO
Ensure that the new repository secret uses the label argocd.argoproj.io/secret-type: repo-creds for compatibility with ArgoCD. This should be handeld by bases.
This process adds the new Project repository to ArgoCD in a declarative, managed manner, making it available for the team’s applications.